There are 23 signal jammers in total GTA 5, and each one of them provides a unique function. Some of them will block the police from tracking you, some of them will disable enemy weapons, and others still help you evade capture.
Below is a comprehensive list of all 23 signal jammers in the game, along with a brief description of what each one does.
1. Fort Zancudo
The first signal jammer is located at Fort Zancudo, and it blocks the police from tracking you.
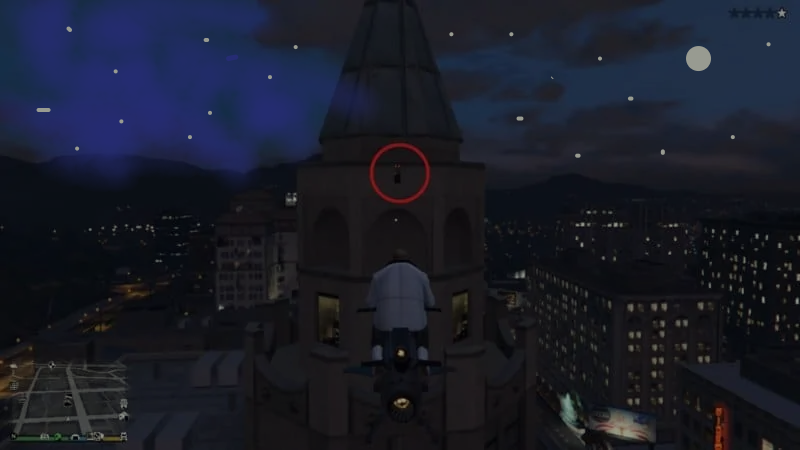
2. Mount Chiliad
The second signal jammer is located at the peak of Mount Chiliad, and it allows you to call Lester Crest to remove your wanted level.
3. Vespucci Beach
The third signal jammers are located across the street in Vespucci Beach, and they both block police tracking within a relatively small radius.
4. Pillbox Hill
The 4th signal jammer is located around the side of Hangman’s Crop Dinner in Pillbox Hill, and it blocks enemy weapons (including your own) for roughly 10 seconds. It also makes cars go haywire, causing them to buzz about erratically, but it only lasts for fifteen seconds or so before that effect wears off.
5. Downtown Los Santos
The 5th signal jammer is located beside The Bean Machine in Downtown Los Santos. It disables enemy weapons within a small radius, much like North Chumash.
6. La Puerta
The 6th signal jammers are located upstairs next to the Ammu-Nation store in La Puerta. There are four of them, and each one blocks police tracking within a relatively small radius.
7. Vespucci Canals
The 7th signal jammers are located across the street from each other in Vespucci Canals, and they both disable enemy weapons (including your own) for roughly 10 seconds. They both also make cars go haywire, causing them to buzz about erratically, but it only lasts for fifteen seconds or so before that effect wears off.
8. Mirror Park
The 8th signal jammer is located in the alleyway behind the DMV in Mirror Park, and it blocks police tracking within a medium-sized radius. This one can be beneficial when you’re trying to evade capture during Lester’s Dead Man Walking mission.
9. Downtown Vinewood
The 9th signal jammers are located across the street from each other in Downtown Vinewood, and they both block enemy weapons (including your own) for roughly 10 seconds. They also both make cars go haywire, causing them to buzz about erratically, but it only lasts for fifteen seconds or so before that effect wears off.
Read More: What Is Mending? And How To Get Mending In Minecraft?
10. Hawick
The 10th signal jammers are located on the roof of a building across from each other in Hawick, and they both block police tracking within a medium-sized radius. This one can be beneficial when you’re trying to evade capture during Lester’s Dead Man Walking mission.
11. Cypress Flats Chinatown
The 11th signal jammer is located inside a warehouse in Cypress Flats Chinatown, and it blocks enemy weapons (including your own) for roughly 10 seconds. It also makes cars go haywire, causing them to buzz about erratically, but it only lasts for fifteen seconds or so before that effect wears off.
12. Little Seoul
The 12th signal jammer is located in Little Seoul, and it blocks police tracking within a medium-sized radius. This one can be beneficial when you’re trying to evade capture during Lester’s Dead Man Walking mission.
13. Burton
The 13th signal jammers are located behind The Bean Machine coffee shop in Burton, and they both block enemy weapons (including your own) for roughly 10 seconds. They also both make cars go haywire, causing them to buzz about erratically, but it only lasts for fifteen seconds or so before that effect wears off.
14. East Vinewood
The 14th signal jammers are located behind the Big Spread Ranch strip club in East Vinewood, and they both block police tracking within a medium-sized radius. This one can be beneficial when you’re trying to evade capture during Lester’s Dead Man Walking mission.
15. Rockford Hills
The 15th signal jammers are located next to each other inside an alleyway in Rockford Hills, and they both block enemy weapons (including your own) for roughly 10 seconds. They also both make cars go haywire, causing them to buzz about erratically, but it only lasts for fifteen seconds or so before that effect wears off.
16. Pacific Bluffs
The 16th signal jammers are located around the back of a coffee shop in Pacific Bluffs, and they both block enemy weapons (including your own) for roughly 10 seconds. They also both make cars go haywire, causing them to buzz about erratically, but it only lasts for fifteen seconds or so before that effect wears off.
17. Route 68
The 17th signal jammer is located at an old rest stop on Route 68, and it blocks police tracking within a medium-sized radius. This one can be beneficial when you’re trying to evade capture during Lester’s Dead Man Walking mission.
18. Raton Canyon
The 18th signal jammers are located at the bottom of Raton Canyon, and they both block police tracking within a medium-sized radius. This one can be beneficial when you’re trying to evade capture during Lester’s Dead Man Walking mission.
19. Grapeseed
The 19th signal jammers are located just outside of Grapeseed, and they both block enemy weapons (including your own) for roughly 10 seconds. They also both make cars go haywire, causing them to buzz about erratically, but it only lasts for fifteen seconds or so before that effect wears off.
20. North Chumash
The 20th signal jammers are located on the roof of a building near the gas station in North Chumash, and they both block police tracking within a medium-sized radius. This one can be beneficial when you’re trying to evade capture during Lester’s Dead Man Walking mission.
21. Marina
The 21st signal jammers are located on the second floor of a small parking garage in Marina, and they both block police tracking within a medium-sized radius. This one can be beneficial when you’re trying to evade capture during Lester’s Dead Man Walking mission.
22. Paleto Bay
The 22nd signal jammers are located near each other at the top of Mount Chiliad in Paleto Bay, and they both block enemy weapons (including your own) for roughly 10 seconds. They also both make cars go haywire, causing them to buzz about erratically, but it only lasts for fifteen seconds or so before that effect wears off.
23. Sandy Shores
The 23rd signal jammer is located on the construction site near the freeway in Sandy Shores, and it blocks enemy weapons (including your own) for roughly 10 seconds. It also makes cars go haywire, causing them to buzz about erratically, but that effect only lasts for fifteen seconds or so before warning off.
FAQs
- What are the best places to set up a Signal Jammer in GTA 5?
There is no definitive answer, as each player’s game experience may differ. However, some good locations for Signal Jammers include:
- Near the Los Santos International Airport
- In the middle of downtown Los Santos
- Inside the Vinewood Hills neighborhood
- Atop Mount Chiliad
- Do Signal Jammers work in multiplayer?
Yes, Signal Jammers work in both single-player and multiplayer modes.
- Can I use a Signal Jammer to prevent other players from stealing my car?
No, a Signal Jammer will not protect your car from being stolen. It will only block communications between players and NPCs.
- Can I use a Signal Jammer to prevent other players from calling the cops on me?
No, a Signal Jammer will not protect you from being reported for committing crimes. It will only block communications between players and NPCs.